Smena-8M camera manual
- manuals:
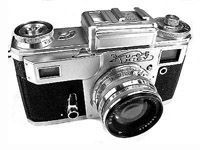
- Kiev-4- Smena-8M
- shooting:
- Compact camera tips and tricks (not translated yet)- landscape photographer tools (not translated yet)
- Grumbler's lair

This translation based on reference book for the camera of 1993 year of construction. Pictures are scanned from that document. If you find any mistakes in translation please let me know, I do not know English well.

|
Contents
|
![]()
Trice-received Lenin Order
Leningrad optical and mechanical union
named after Lenin
Introduction
"Smena-8M" is the modern low-cost 35mm film camera intended for wide circle of amateur photographers.
Coated lens, viewfinder which shows the scene in the natural scale, presence
Both weather symbols and film ISO speed scales presence help to find exposure and allows shooting outside even for amateur photographer who has only basic skills in photography.
Rewind mechanism allows using of one cassette, camera construction support two cassettes usage as well.
All these features as well as simplicity, reliability and modern appearance make
Camera is produced to work at temperature from -15 to +45°С out of direct sunlight and atmospheric precipitates.
Before using the camera please read cerefully guidlines and instruction for the camera.
Check presence of tear-off warranty cards in the manual, remember that warranty void if you loose them.
Specifications
| Film width, mm | 35 |
| Frame size, mm | 24x36 |
| Exposures on a film | 36 |
| The lens — coated anastigmatic triplet T-43: | |
| Focal lenght, mm | 40 |
| Maximum aperture | 1:4 |
| Shutter speeds, s | 1/15, 1/30, 1/60, 1/125, 1/250 and "B" |
| Distance scale, m | from 1 to "infinity" |
| Aperture scale | 4; 5.6; 8; 11; 16 |
| Film ISO speed scale | GOST/ISO 16, 32, 64, 125, 250 DIN 13, 16, 19, 22, 25 |
| Filter thread | M35.5x0.5 |
| Camera contains 0,0115 g of silver. | |
Camera kit
- "Smena-8M" camera — 1
- Receiving reel — 1
- Case — 1
- Box — 1
- Manual — 1
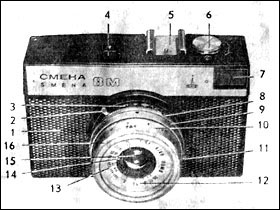
Camera parts
The lens aperture is intended to change the diameter of the light beam through the lens. Close the aperture by turning the aperture ring when you need to increase depth of field or when at chosen shutter speed scene the light is excessive.
Shutter speed and aperture scales stops counted so that increasing (decreasing) shutter speed or aperture by 1 stop increase (decrease), respectively, by 2x light passing through the lens to the film. For example, if at aperture 1:5.6 shutter speed is 1/60 s, then at aperture 1:8 shutter speed at the same conditions should be 1/30 s.
There are only denominators on the scales of shutter speed and aperture:
"250" instead of 1/250, "8" instead of 1:8, etc.
Depth of field scale is at the both sides of distance scale pointer and is intended for approximate depth of field calculation, i.e. distance range within which objects will come sharp on the negative.
You can see the front and the rear edges of depth of field opposite the same marks on both sides on the DOF scale. For example, if distance is set on 2 m and aperture on 1:5.6, then opposite "5,6" mark on DOF scale you can find 3 m and 1.5 m.
If you close the aperture the front edge of depth of field goes closer to the camera and the rear one goes farther; at aperture 1:11 the scene will be sharp within interval from 1.2 m
The distance symbols scale is on the lens tube with the distance scale; each symbol corresponds to an appointed distance. The symbol ![]() corresponds to 1 m and should be set during vertical portrait shooting; the symbol
corresponds to 1 m and should be set during vertical portrait shooting; the symbol ![]() corresponds to 1.4 m and should be set during horisontal portrait shooting; the symbol
corresponds to 1.4 m and should be set during horisontal portrait shooting; the symbol ![]() corresponds to 4 m and should be set during small group shooting; the symbol
corresponds to 4 m and should be set during small group shooting; the symbol ![]() corresponds to 8 m and should be set during ladscapes and architecrure shooting with the foreground.
corresponds to 8 m and should be set during ladscapes and architecrure shooting with the foreground.
The weather symbols scale is intended for finding and setting shutter speed. The guidlines created for using weather symbols and film ISO speed to calculate and set the exposure are shown in the table 1.
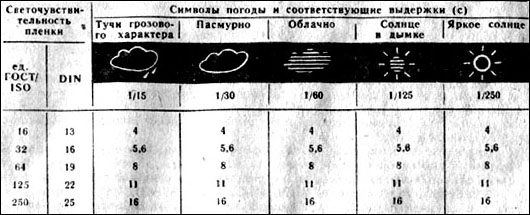
When you set the film ISO speed using the scale on the front part of the lens you set simultaneously an aperture value which is shown in the table 1. For example, ISO speed 65 GOST/ISO (19 DIN) corresponds to the aperture 1:8.
Shutter speeds are set by means of weather symbols scale. If it is sunny you should set the symbol "Sun", that corresponds to shutter speed 1/250 s. When you choose the weather symbol there may be some discrepancy between the weather condition and the symbol because five symbols cannot describe all weather (sky) conditions. In spite of this all negatives got after shooting with the using of weather symbols will be good enough for print by a magnifier if you choose an appropriate paper.
Remember that weather symbols scale is usable from 8 a.m. till 5-6 p.m. in the period from April to August and from 10 a.m. till 2-4 p.m. in the period from September to March. At sunny weather in the deep shadow it is recommended to make exposure correction, for example, to set the symbol "sun in haze" instead of the symbol "sun".
The weather symbols method of shutter speed finding cannot guarantee good results in the early morning and in the twilight and other unfavorable lightning conditions, especially during the dark season. In such cases you need to make trial shots or to use an exposure meter.
After you have got good experience you may use aperture and shutter speed scales if you want. This introduces more elements of creative work. The central shutter automatically provides speeds of 1/250, 1/125, 1/60, 1/30 and 1/15 s. When you set shutter speed "B" you can use any shutter speeds which are controlled by hands.
To cock the shutter turn the lever 2 (см. fig. 1) down up to stop.
To set shutter speed turn the weather symbol (shutter speed) setting ring till the index match with a required speed mark.
The camera has the flash contact whish fires a flash at the moment of full shutter opening.
If you use a rechargeable flash you may set any shutter speed. If you use one-time flash the shutter speed should be 1/15 s or "B". Flash synchronizer actuated automatically after shutter release.
The frame counter points exposed frames number. Each point on the counter scale corresponds to two frames.
Camera usage
Cassette loading
In the camera you can use both domestic (USSR) cassettes and imported ones. The cassette consists of the case, the reel
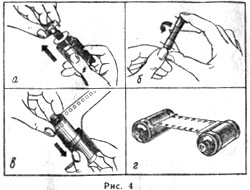
Before load the cassette you should remove the lid and pull out the reel as shown on fig. 4 (upper-left picture). The cassette must be loaded in the darkness. First, you should cut the film end, pull down the spring and fasten the film so that the emulsion side is turned to the reel axis as shown on fig. 4 (upper-right picture). It is recommended to wind the film tight but without force, hold it by edges and do not touch the emulsion. Then insert the reel into the case and close the cassette with the lid as shown on fig. 4 (bottom-left picture). Subsequent operations with the cassette you may perform in the daylight.
If you use one cassette insert the receiving reel into the right socket of the camera body.
If you use two cassettes prepare them to loading into the camera as shown on fig. 4 (bottom-right picture).
Camera loading
If you use one cassette insert it into the left socket of the camera body so that rewind head fork plugs into the cassette reel then push the reel free end.

Insert the film free end into the cut of the receiving reel, fastening the film perforation by the cut cog. Make one turn of the winding head (fig. 5).
If you use two cassettes remove the receiving reel and insert both cassettes so that both forks plug into cassettes. Rotate the winding head to pull slightly and plane the film, holding cassettes to protect them from turning. The film should lay on the frame window without warps, the perforation should match with the frame counter cog-wheel.
Close the camera and lock the rear panel, put the camera into the case and fasten it with the tripod bush.
Wind two shots to wind exposed film end. To do it press the shutter release and release it and rotate winding head smoothly up to stop twice.
Set the frame counter to "0" by rotating its ring.
Shooting
To prepare the camera for shooting set shutter speed and aperture. In "Smena-8M" camera you can set shutter speed and aperture by two options: using weather symbols or matching shutter speed and aperture scales with corresponding indexes.
To set shutter speed and aperture using weather symbols:
- set film ISO speed on the scale on the front part of the lens by rotating the ring till the index matches with the corresponding ISO speed value; the lens aperture in this case is closed to a value which you can see on the aperture scale;
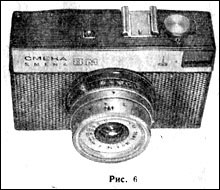
- estimate weather conditions and by rotating the weather symbols ring set the index opposite the corresponding weather symbol (fig. 6).
To set shutter speed and aperture using scales:
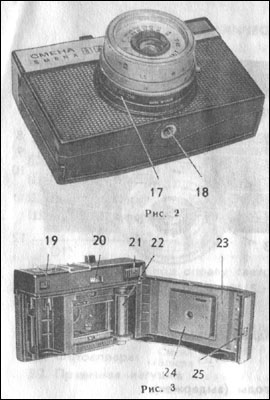
- set shutter speed by rotating the shutter speed ring till the index matches with the required shutter speed on the scale drawn on the side part of the shutter (fig. 2);
- set aperture value by rotating the aperture ring till the index matches with the required value on the scale drawn on the front lens part.
Notice
If you shoot on the color film the best quality of the shot you can reach closing the aperture to 1:5.6 and more.
After you set aperture and shutter speed focus the lens. To do it estimate distance
Cock the shutter and press smoothly the shutter release up to stop.
Turn winding head up to stop to wind the film.
To unload the camera if you use one cassette rewind the film back into the cassette. To do it press the shutter release and hold it pressed. Pull the rewind head and rotate it
If during film rewinding the shutter release button was released accidentally and at second pressing the film rewinds with force it is recommended to turn slightly the head 21 (fig. 3).
Notice
Please take into account that the rewind mechanism works properly only if the film can move smoothly through the cassette cut.
Take the camera out of the case, open the rear panel, take out the cassette and close the camera.
If you work with two cassettes you do not need to rewind the film.
Maintenance
The camera requires delicate handling. Durty lenses worsen image quality, and so you should permanentely take care about lens cleanness. Wipe only outer parts of the lens and the viewfinder with a clean cambric or linen tissue, breathe beforehand on glass surface.
Attention! Do not disassemble the camera.
Do not wipe plastic parts of the camera with spirit, acetone and other dissolvents.
There can be small discrepancy between camera construction and this manual due to permanent improvement of the camera. This changes do not worsen camera quality.
Example shots
"Smena" — is not an ordinary piece of plastic with a piece of glass. By this camera you can take very nice photos. And you do not need to warry about the camera. This factor in connection with the small camera weight became the reason why I stick to "Smena" when I was choosing the camera for a kayak trip. And "Smena" did not disappoint me.
Some shots from that trip are presented in the site Gallery. You can find them on the first page. They were printed 20x30 cm size and looks not worse than other cameras shots.