Kiev-4 camera manual
- manuals:
- Kiev-4- Smena-8M
- shooting:
- Compact camera tips and tricks (not translated yet)- landscape photographer tools (not translated yet)
- Grumbler's lair

This translation based on reference book for the camera of 1959 year of construction. Pictures are scanned from that document. If you find any mistakes in translation please let me know, I do not know English well.
|
Contents |
Introduction
"Kiev" camera is a 35mm high-end film camera and intended for amateur photographers, professional photographers and for being used in research and scientific works.
"Kiev-4A" — without exposure meter |
 |
| Fig. A. "Kiev-4A" camera | |
 |
|
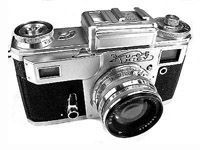
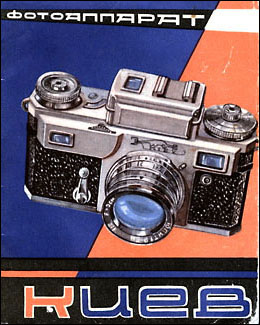
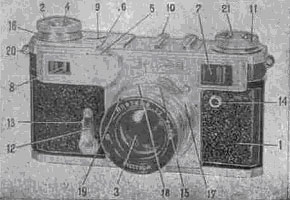
| Fig. B. "Kiev-4" camera |
Specifications
Film frame size — 24x36 mm. Load of 1.6 m film provides 36 shots.
The shutter is slotted with hinged metal curtains.
Shutter speed: bulb – "B" ("short" and "long" time) and automatic — 1/2, 1/5, 1/10, 1/25, 1/50, 1/125, 1/250, 1/500, 1/1250 of a second.
Shutter mechanism is blocked with the film winder. That excludes double exposition of one frame.
Coated lens — "Jupiter-8M" f=5 cm; max aperture 1:2.
Focusing — by optical rangefinder with range from 0.9 m to infinity. Viewfinding — by optical viewfinder.
Rangefinder and viewfinder are combined and have one ocular.
Camera has shutter self-timer. Timer is set on 9-15 seconds delay.
Camera rear panel is removable.
"Kiev-4A" camera has a film ISO speed pointer.
"Kiev-4A" camera has a compact high-sensitive photoelectric exposure meter which works at luminosity range from 25 asb to 100000 asb.
Exposure ranges from 8 s to 1/1250 s. Light flow reception angle 65°-70°.
"Kiev-4A" camera (both options) has a contact for a flash.
Lather case allows taking pictures without pulling out camera from the case.
Camera measurements
"Kiev-4A" option — 150x81x60 mm
"Kiev-4" option — 150х89x60 mm
Camera weight with the case:
"Kiev-4A" option — 0,995 kg.
"Kiev-4" option — 1,065 kg.
Outward parts of "Kiev-4A"
The scale is marked twice on both ring sides for aperture setting convenience after lens focusing. |
|
Loading
Preparing for loading
1. Unfasten rear buttons of the case and unscrew a screw at the bottom of the case, then pull the camera out of the case.
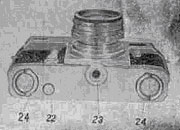
2. Turn up two cramps at the rear panel 24 (Fig. 2) and turn them half way round
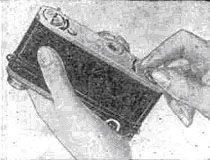
Fig. 4. Rear panel locks opening
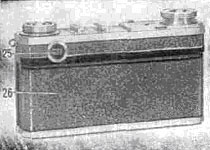
3. Shift rear panel 26 slightly towards the bottom of the camera and remove it. During this hold the camera with lens down to avoid cartridge and receiving spool falling out (Fig. 5).
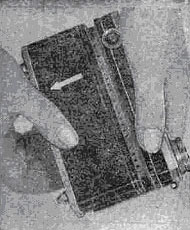
Fig. 5. Rear panel removing
Cartridge loading and assembling
A cartridge consists of two cylinders, one inserted into the other, and a spool for film. The cartridge must be loaded in the full darkness.
Before loading the cartridge should be opened by pressing on high button at the bottom and by turning inner cylinder clockwise to match openings of cylinders. Then pull one cylinder out of the other and extract the spool from the inner cylinder (Fig. 6)

Fig. 6. Cartridge opening
Cut film end as shown on Fig. 7 and fasten it in the spool cut as shown on the figure below.
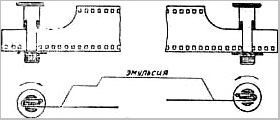
Fig. 7. Film loading
Roll the film tightly turning counter-clockwise the spool by the head. Hold the film by edges to prevent emulsion touching.
The film should be positioned with emulsion to the spool tube.
If the film is winded correctly it does not go beyond flanges of the spool. During winding avoid pulling coils because this may result in emulsion scratching.
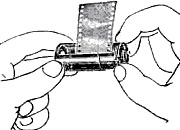
Fig. 8. Inserting into the second cylinder
Insert the spool with the film into the inner cylinder with the head inside and push the outer cylinder up to the stop (Fig. 8), left outside about 5 cm of the film, then turn the inner cylinder counter-clockwise half way up to lock (Fig. 9). In this position in the middle of the cut the mark "closed" should be seen.

Fig. 9. Cartridge closing
Camera loading
The camera may be loaded in the daylight (better in dim light). To load the camera you should:
a) Fix film end in receiving spool (Fig. 7).
b) Insert the cartridge into the left compartment of the body and the receiving spool
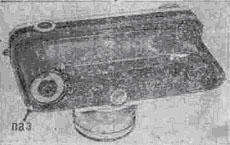
Fig. 10. Loaded camera
Notice:
As a recieving spool you can use a "Kiev" camera cartridge. In this case you will not need to rewind the film.
At loading cartridge lug should match with body slot, otherwise loading is incorrect and may lead to cartridge breakage. Emulsion side of the film should be turned to lens.
c) Close camera. To do it put rear panel edges into body slots and while you hold film end with left hand thumb insert the rear panel upwards up to stop, turn locks cramps and put them down.
When lock is turned the cartridge opens.
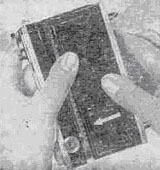
Fig. 11. Closing the rear panel
During loading an end of the film exposes. To feed unexposed film to the frame window you need to cock and release the shutter twice. If the camera is loaded correctly the rewind head turns in the direction opposite to the arrow engraved on it while you turn shutter cock head.
If the film is not reeled tight rewind head is still at first frames.
d) Set frames counter to "0" by rotating obtrusive disk part as shown on Fig. 12.
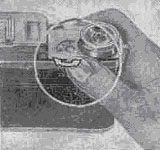
Fig. 12. Setting rames counter to "0"
e) Set film ISO speed pointer. To do it set in window 11 (see Fig. 1) required ISO number by rotating button of the scale 21. There are engraved numbers on the scale 21 which correspond to black and white film speed in GOST units (very close to ISO) and icons
The camera may be loaded with film reels with leader tape instead of cartridge. Pecularities of such film loading are the following:
in the receiveing spool you should fix leader tape end instead of film end;
frames counter disk should be set to "27" (marked with red dot) instead of "0";
to feed the film you should cock and release shutter 9 times, until frame counter become "0".
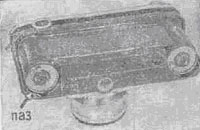
Fig. 13. Camera loaded with 2 cartridges
Shooting
Shooting process consists of the following operations:
- Cocking the shutter
- Setting shutter speed
- Setting aperture value
- Focusing
- Viewfinding
- Shutter release
1. To cock the shutter turn its head clockwise one turn up to stop (Fig. 14).
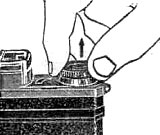
Fig. 14. Setting shutter speed
2. To set shutter speed lift up and turn shutter cock head till its black dot matches
Recommendations:
a) If you change shutter speed from longer to shorter (for example from 1/50 s to 1/125 s) turn black dot slightly farther than needed and then get to the required position and put down by reverse turn.
b) Set shutter speed after shutter is cocked.
3. To set aperture value (Fig. 15) turn the ring 19 (Fig. 1) which fixes at any aperture value mark.
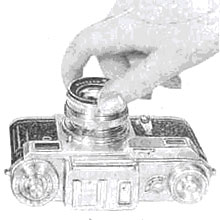
Fig. 15. Setting aperture of the f=5 cm lens
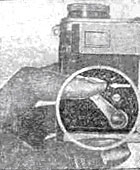
4. For rangefinding and focusing (Fig. 16) turn disk 5 (Fig. 1). Disk 5 rotation is possible after pressing the lever 6 (Fig. 1) which fixes the lens focused at infinity.
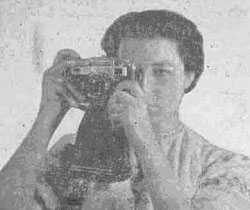
Fig. 16. Focusing
At the center of the rangefinder viewing area you can see lighter rectangle. In this rectangle the scene has doubled lines.
To focus you need to match doubled image into one (Fig. 17). It is recommended to match them in the center of the small rectangle.
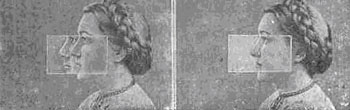
Fig. 17. Matching doubled images
If you know the distance to the scene you may focus using distance scale.
To do it you should turn disk 5 (Fig. 1) up till the line of the required value on the distance scale 18 (Fig. 1) matches with the dot at the scale (Fig. 18).
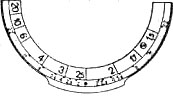
Fig. 18. Focusing at 2.5 m
It is recommended to shoot without using rangefinder only if aperture size is small. In this case errors of distance estimation by eye is less than depth of field.
On both sides of the dot on the outer unmovable ring which points focus are scales of depth of field. They shows the ranges of sharp image depending on distance to object and aperture value.
For example: f=5 cm lens set to 4 m. At aperture value 8 all objects from 2.5m to 10 m will be sharp (Fig. 19).
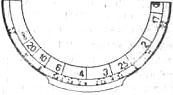
Fig. 19. Depth of field
Notice:
All distances should be counted from the film surface.
5. To do viewfinding you should look through ocular during focusing. In ocular you can see 100% of the scene seen by film.
6. To release the shutter (Fig. 20) press button 4 (Fig. 1).
When you use shutter speed from 1/2 of a second to 1/1250 of a second the shutter opens and closes automatically. At shutter speed "B" the shutter is opened till the sutter release button is pressed.
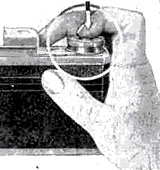
Fig. 20. Shutter release
To get long exposure shutter release button may be fixed as pressed by turning it counter-clockwise up to stop (Fig. 21).
The shutter closes after back turn of the shutter release button up to red dots matching and releasing the button.
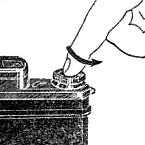
Fig. 21. Shooting with long exposure
To avoid blur images it is recommnded to shoot with exposures longer than
The shutter can be released automatically using self-timer (Fig. 23).
To cock self-timer mechanism turn lever 12 (Fig. 1) up to stop (Fig. 22). Lever position when self-timer mechanism is cocked shown on Fig. 23. To start self-timer move the button 13 (Fig. 1) in the direction shown by the arrow. Self-timer delay is about 9-15 seconds.
 |
 |
Fig. 22. Self-timer cocking |
Fig. 23. Self-timer release |
"B" shutter speed when you use self-timer is about 1 to 3 seconds (it is recommended to check its value before using camera).
Unloading
To unload exposured film from the camera rewind it back into the cartridge. To do it close the lens with a lens cap, press film transporter release buttom 22 up to stop (Fig. 2) and turn the rewind head 11 (Fig. 1) in the direction shown by the arrow (Fig. 24).
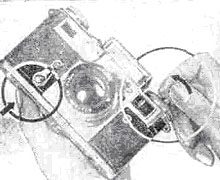
Fig. 24. Rewinding
After rewinding remove the rear panel, extract the cartridge and release film end
"Kiev-4" camera
"Kiev-4" camera differs from the "Kiev-4A" by a photoelectic light meter placed at the top
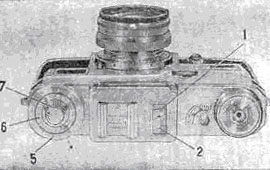
Fig. 25. Exposure meter top view
"Kiev-4" view shown on Fig. B.
The photoelectric light meter consists of the following main parts: the photoelement which is placed behind the ribbed plate 3 (Fig. 26); the galvanometer with the pointer 1 and the scale 2 (Fig. 25) and the calculator 4 (Fig. 26).
The calculator has the scales of shutter speeds engraved on the ring 5 (Fig. 25), ISO speed and aperture values are on the disk 6 (Fig. 25).
The top ring 8 (Fig. 26) is the rewind head. To rewind the film pull out the head and rotate it.
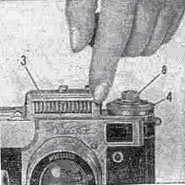
Fig. 26. Photoelement lid opening
To define shutter speed you should:
1. By rotating the disk 6 (Fig. 25) set film ISO speed at "triangle" pointer on the disk 7 (Fig. 25).
If the camera is loaded with the film which ISO speed is not pointed on the scale (for example 45 ISO), then set "triangle" pointer in the middle between values 32 и 65.
2. Point the camera at the scene and by pressing the button open the photoelement lid (Fig. 26).
3. Turn shutter speed scale ring 5 (Fig. 25) to set the galvanometer arrow at the "rhomb" mark on the galvanometer scale 2.
4. Find required exposure using shutter speed and aperture scales. Red numerals
5. Close photoelement lid and turn the shutter speed ring clockwise up to stop.
Example of exposure finding
The camera is loaded with the film of 32 ISO.
Turn the disk 6 (Fig. 25) to set value 32 opposite the "triangle" pointer on the disk 7 (Fig. 25). Rotate the shutter speed scale ring 5 (Fig. 25) to make the galvanometer arrow point on the "rhomb" mark. The shutter speed scale is positioned so that value 125 on it is under value 2 on the aperture scale 6 (Fig. 25).
So, for aperture value 2 you should set shutter speed 1/125 of a second, for aperture 4 — 1/25 of a second, etc.
On the galvanometer scale 2 (Fig. 25) in addition to the "rhomb" mark you may find values 2 and 4. These are multipliers which you should use when the galvanometer arrow cannot reach the "rhomb" mark at the full rotation of the shutter speed scale counter-clockwise
For example:
Film ISO speed is 32, after the shutter speed disk rotation counter-clockwise up to stop the galvanometer arrow pointed to the value 2. The shutter speed mark of 1/2 of a second is under the aperture value 8. Multiplying 1/2 of a second by 2 gives required shutter speed 1 second.
The photoelectric exposure meter is the precise and complex device and requires especially careful usage.
Do not bump and shake the exposure meter!
Open the photoelement lid only during exposure metering and do not point the exposure meter with the opened lid directly to the Sun!
Using with flashes
"Kiev-4A" and "Kiev-4" cameras have flash synchronizers for flashes both one-time and rechargeable which have the appropriate plug.
Rechargeable flashes should be used with shutter speeds equal or longer than 1/25 s, because at these speeds the frame window is fully open during shutter release.
One-time flashes should be used with shutter speeds equal to 1/10 s. One-time flash usage is acceptable at light which does not lead to veiling (without the flash).
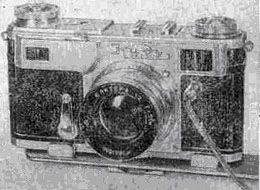
Fig. 27. Connecting the plug
Wheh the shutter is not cocked electric contacts of the camera are shorted and when shutter is cocked they are broken. So, if you use the flash you should cock the shutter just after shutter release.
Plugging or unplugging flashes and setting new lamp (if you use one-time flash) should be done only when shutter is cocked.
Use flashes as described in instructions supplied with flashes.
Interchangeable lenses
"Kiev" camera has the following additional lens:
| No. | Lens name | Focal length, cm |
Max. aperture | Purpose |
| 1 | Jupiter-11 | 13.5 | 1:4 | Telephoto |
| 2 | Jupiter-9 | 8.5 | 1:2 | Portrait |
| 3 | Jupiter-12 | 3.5 | 1:2.8 | Wide angle |
| 4 | Jupiter-3 | 5.0 | 1:1.5 | Low-light |
These lenses can be set on camera mount instead of the standard lens. The standard lenses "Jupiter-8M" and the"Jupiter-3" are set on the inner mount, and all others —
To unmount the "Jupiter-8M" or "Jupiter-3" lens you should press on the spring which fastens the lens so that it pull down under the red protrusion, turn the lens clockwise up to matching red dots on the lens and on the front panel of the camera and pull the lens out (Fig. 28).
To mount "Jupiter-8M" or "Jupiter-3" lens use the back order of operations.
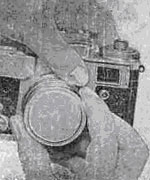
Fig. 28. Unmounting f=5 cm lens
Notice:
Before mount or unmount any lens distance scale of the camera and the lens should be set to infinity.
Lenses "Jupiter-11" , "Jupiter-9" and "Jupiter-12" have their own scales of distance, DOF and aperture.
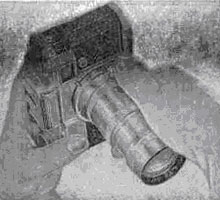
Fig. 29. Mounting f=13.5 cm lens
Before "Jupiter-9", "Jupiter-11" or "Jupiter-12" lens mounting remove lens rear dust cap then put the lens on the outer mount ring (Fig. 29) so that the red dot on the lens ring is opposite the red dot on the front panel of the camera and turn it counter-clockwise to fasten.
If the lens mounted properly the disk 5 (Fig. 1) rotates when you turn the lens focusing ring.
To unmount these lens use the back order of operations.
When you use additional lens viewfinding (Fig. 30) should be done through universal viewfinder which mounts on the outer accessories mount 10 (Fig. 1).
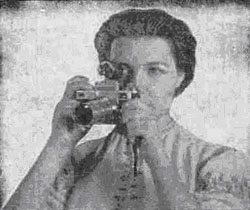
Fig. 30. Using f=13.5 cm lens
Use the camera rangefinder for focusing, however, to reduce the rangefinder gear load rotate the lens focusing ring instead of the disk 5 (Fig. 1).
Maintaining
1. Store the camera in dry place and avoid dust, dirt and moisture.
2. Protect the camera from bumps and shakes (especially "Kiev-4"), because this may cause mechanism damage, first of all, the exposure meter.
3. If the outside temperature is below -10°С do not leave the camera on the open air, hold it under the wear and take out only for shooting.
4. Carefully protect the lens from dust and dirt to clean optics rarely because this may lead to coating damage.
5. If you bring the camera from the frost to a warm place do not open the camera case before the camera get warm to avoid weeping.
6. Do not apply much force when use the camera. If you find any defect or damage do not try to repair by your own. The camera should be repaired and adjusted by qualified personnel only.
What to read about "Kiev-4" camera